DuoConnect for SSH Access
DuoConnect lets you easily access your organization’s SSH servers and RDP hosts without needing to use a VPN when your organization has deployed Duo Network Gateway.
DuoConnect is supported on 64-bit versions of Windows, macOS, and Linux systems. To use DuoConnect, you'll need to install the DuoConnect client software on your workstation, then perform some configuration steps for SSH or RDP to work. Your Duo administrator will send you the detailed connection information you’ll need to update your SSH and RDP connections.
Contents
Windows Clients
Install DuoConnect
The Windows 11 24H2 feature update prevents DuoConnect from connecting to RDP, SMP, or custom DNG application relay apps. Windows 11 clients with the 24H2 update should install DuoConnect 2.0.6 or later to access application relay apps. Contact your organization’s Duo administrator for assistance if you're not sure what kind of apps you will use.
- Download the latest DuoConnect Installer for Windows on your computer while logged in as an administrator. View checksums for Duo downloads.
- Double-click the downloaded MSI file to launch the installer.
- On the "DuoConnect Setup Wizard" page, click Next.
- On the "Destination Folder" page leave the default destination selected and click Next.
- Click Install on the "Ready to install DuoConnect" page. If a pop-up appears asking "Do you want to allow the following program to install software on this computer?", click Yes.
- Click Finish on the "Completed the DuoConnect Setup Wizard" page to exit the installer.
Configure SSH
Now that you’ve installed DuoConnect, you need to update your SSH client configuration to use it.
PuTTY
- Open up PuTTY and load a saved PuTTY session for the SSH server you'll be connecting to with DuoConnect.
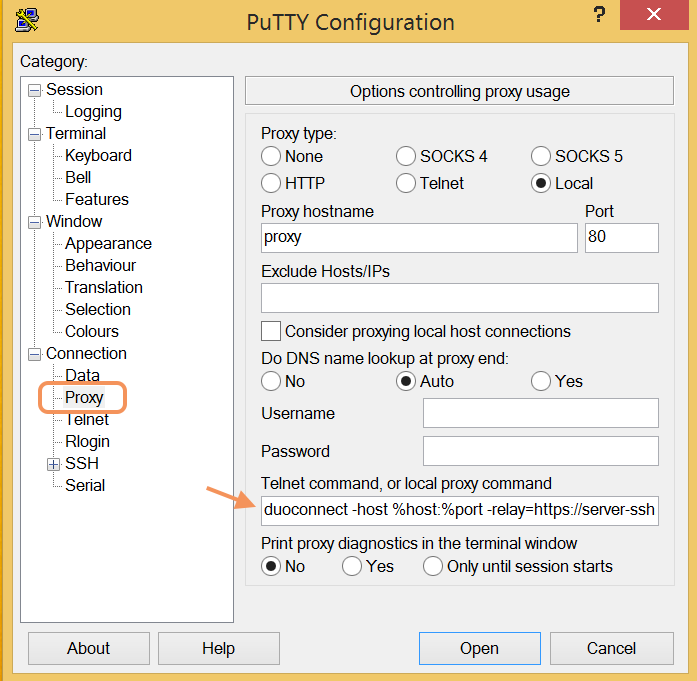
- Expand the Connection category on the left-hand side of the PuTTY session window, and then click on Proxy. The "Options controlling proxy usage" appear on the right-hand side of the window.
- Under "Proxy type" select Local.
- Under "Telnet command, or local proxy command" copy and paste in the DuoConnect connection string you received from your Duo administrator.
Here's an example of what the command might look like:
duoconnect -host %host:%port -relay=https://server-ssh.example.com - Return to the saved PuTTY session window and click Save to update the session with the DuoConnect information.
- Repeat the saved session configuration steps for all SSH servers you will access using DuoConnect.
- Test your SSH connection.
Git, Cygwin, and Other OpenSSH based Terminals
- Open your ~/.ssh/config file in a text editor. If you don't have this file, create it.
- Copy and paste in the DuoConnect connection strings you received from your Duo administrator into the end of your config file.
Here's an example of what the command might look like:
Host server.example.com ProxyCommand duoconnect -host=%h:%p -relay=https://server-ssh.example.com - Repeat these steps for all SSH servers provided to you by your Duo administrator.
- Save the ~/.ssh/config file.
- Test your SSH connection.
Configure RDP
DuoConnect for RDP access does not support shared client computers. If you try to use DuoConnect with RDP on a computer shared by multiple users you may experience issues. For the best results you should be the only user of the computer where you set up RDP access with DuoConnect.
Install Duo Desktop
To access RDP hosts with DuoConnect you also need Duo Desktop installed on your computer.
Check to see if Duo Desktop is already installed on your computer:
- Open the Start Menu with the Windows key ⊞ or click the Windows logo on the far left of the taskbar.
- Type Duo Desktop and click the application search result.
- If Duo Desktop is already installed, open it.
- Click the menu icon (three stacked horizontal lines) in the upper-left and go to Preferences.
- Verify the installed version is 2.24.0 or later.
If Duo Device Health is installed but is not version 2.24.0 or later, click the Check now button shown in Preferences to check for an update. Follow the on-screen instructions to install the update to Duo Desktop.
If Duo Desktop app is not present, then you need to install it before continuing. Duo Desktop supports Windows 10 and later.
Download the Duo Desktop installer from this link.
View checksums for Duo downloads.
Duo Desktop installation requires that you have administrator privileges on your computer. If you do not have administrative rights on your computer or encounter issues installing Duo Desktop, please contact your organization's Duo administrator or Help Desk.
Update DuoConnect
RDP access requires DuoConnect 2.0.2 or later. If you installed DuoConnect before April 2022 you might need to update it.
To check your installed DuoConnect version:
- Open the Start Menu with the Windows key ⊞ or click the Windows logo on the far left of the taskbar.
- Type Add or remove programs and click the Add or remove programs system settings item.
- Scroll down the "Apps & features" list until you locate DuoConnect.
- Click on DuoConnect in the list to see the installed version.
- Verify the installed version is 2.0.2 or later.
If you need to update DuoConnect, download and run the latest DuoConnect Installer for Windows on your computer while logged in as an administrator. View checksums for Duo downloads.
When you have installed the latest DuoConnect version then you can continue setting up RDP access.
Configure DuoConnect in Duo Desktop
You need to update Duo Desktop's settings with information about your organization's Duo Network Gateway server. If you do not know the hostname you should enter, ask your Duo administrator or Help Desk.
- Click on the Duo Desktop icon in the system tray to open Duo Desktop.
- Click the menu icon (three stacked horizontal lines) in the upper-left.
- Click on the DuoConnect menu item to open the "Welcome to DuoConnect" page. Click Get Started. If you do not see this menu item, make sure that you have both DuoConnect 2.0.2 or later and Duo Desktop or Duo Device Health 2.24.0 or later installed, and install updated versions if needed.
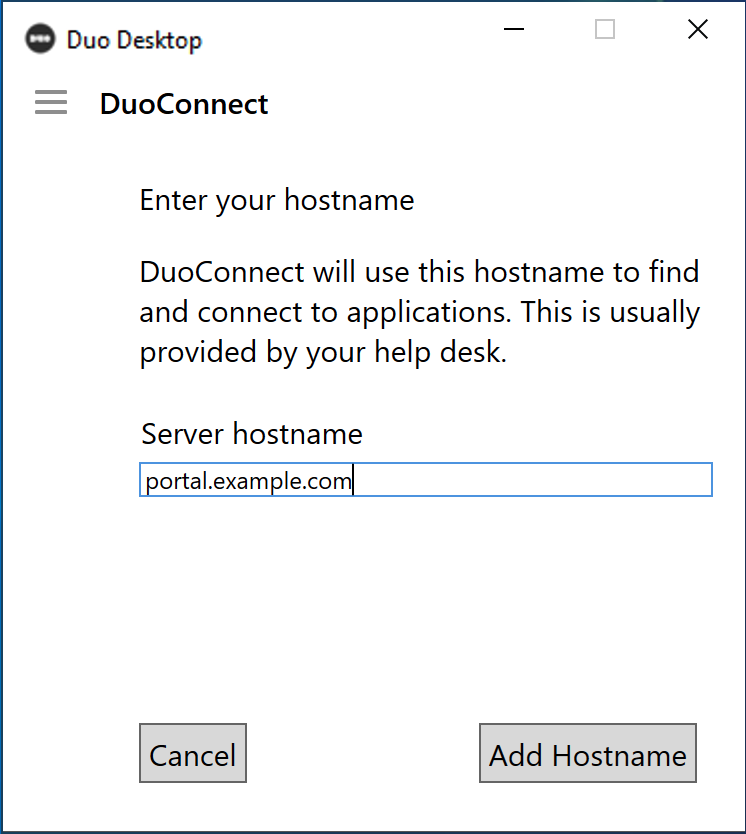
- On the "DuoConnect" app screen, enter the hostname of your Duo Network Gateway (such as "portal.example.com") as the Server hostname and then click Add Hostname. This sets your Duo Network Gateway hostname as the configured DuoConnect hostname.
- Click anywhere else on the Windows desktop to minimize Duo Desktop's window back to the system tray.
If you need to change the configured Duo Network Gateway hostname, return to the DuoConnect menu item in Duo Desktop to view configured hostname, and click the X icon to the right of the hostname to delete it and enter a new one.
Create an RDP Server Connection
Your organization's Duo administrator or Help Desk should provide you the RDP hostname to enter when configuring the RDP connection.
- Open the Start Menu with the Windows key ⊞ or click the Windows logo on the far left of the taskbar, or click the search icon in the task bar.
- Type Remote Desktop and click the application search result.
- Enter the RDP hostname provided by your administrator, such as rdp1.external.example.com, as the "Computer" name.
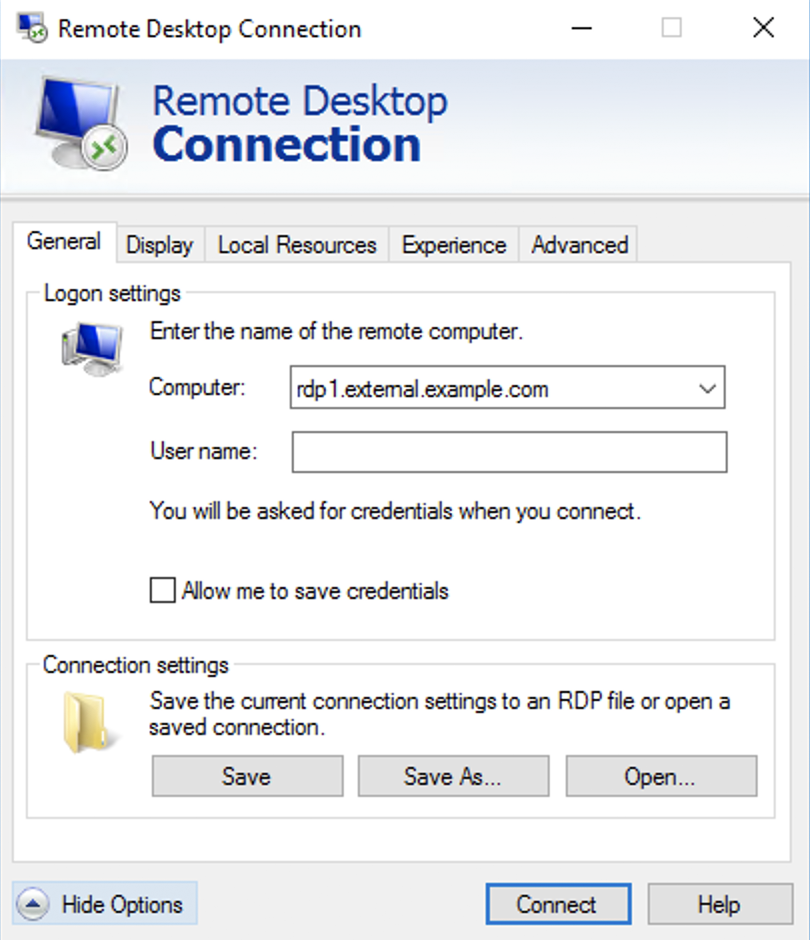
- Set any other options you want for this remote computer connection by clicking Show Options to expose the settings tabs. If you enable the "Allow me to save credentials" for the Windows credentials, then you'll be able to save your password for the remote system for future connections, instead of entering your login information every time.
- Click Connect to launch the RDP connection.
macOS Clients
Install DuoConnect
- Download the latest DuoConnect Installer for macOS on your computer while logged in as an administrator. View checksums for Duo downloads.
- Double-click the pkg file to launch the installer.
- On the "Welcome to the DuoConnect Installer" page, click Continue.
- On the "Select a Destination" page leave the default destination selected and click Continue.
- Click Install on the "Select Install on HD" page.
- When the installer prompts you to enter your username and password, enter the required information and click Install Software.
- Click Close on the "The installation was completed successfully" page. When asked if you'd like to move the installer to trash, click Move to Trash to delete the installer package from your system.
Configure SSH
Now that you’ve installed DuoConnect, you need to update your SSH client configuration to use it.
Terminal
- Open your ~/.ssh/config file in a text editor. If you don't have this file, create it.
- Copy and paste in the DuoConnect connection strings you received from your Duo administrator into the end of your config file.
Here's an example of what the command might look like:
Host server.example.com ProxyCommand duoconnect -host=%h:%p -relay=https://server-ssh.example.com - Repeat these steps for all SSH servers provided to you by your Duo administrator.
- Save the ~/.ssh/config file.
- Test your SSH connection.
Configure RDP
DuoConnect for RDP access does not support shared client computers. If you try to use DuoConnect with RDP on a computer shared by multiple users you may experience issues. For the best results you should be the only user of the computer where you set up RDP access with DuoConnect.
RDP with DuoConnect requires macOS 11 or later.
Install Duo Desktop
To access RDP hosts with DuoConnect you also need Duo Desktop installed on your computer.
Check to see if Duo Desktop or later is already installed on your computer:
- Open Spotlight with Command key ⌘ + Space bar.
- Type Duo Desktop and click the application search result.
- If Duo Desktop is already installed, open it.
- Click the menu icon (three stacked horizontal lines) in the upper-left and go to Preferences.
- Verify the installed version is 2.24.0.0 or later.
If Duo Device Health is installed but is not version 2.24.0 or later, click the Check now button shown in Preferences to check for an update. Follow the on-screen instructions to install the update to Duo Desktop.
If Duo Desktop is not present, then you need to install it before continuing.
Download the Duo Desktop installer from this link.
View checksums for Duo downloads.
Duo Desktop installation requires that you have administrator privileges on your computer. If you do not have administrative rights on your computer or encounter issues installing Duo Desktop, please contact your organization's Duo administrator or Help Desk.
Update DuoConnect
RDP access requires DuoConnect 2.0.2 or later. If you installed DuoConnect before April 2022 you might need to update it.
To check your installed DuoConnect version:
- Open Spotlight with Command key ⌘ + Space bar.
- Type Terminal and click the application search result.
- In the Terminal window enter:
/usr/local/bin/duoconnect -v - Verify the version output is 2.0.2 or later.
If you need to update DuoConnect, download and run the latest DuoConnect Installer for macOS on your computer while logged in as an administrator. View checksums for Duo downloads.
When you have installed the latest DuoConnect version then you can continue setting up RDP access.
Configure DuoConnect in Duo Desktop
You need to update Duo Desktop's settings with information about your organization's Duo Network Gateway server. If you do not know the hostname you should enter, ask your Duo administrator or Help Desk.
- Click on the Duo Desktop menu bar icon to open Duo Desktop.
- Click the menu icon (three stacked horizontal lines) in the upper-left.
- Click on the DuoConnect menu item to open the "Welcome to DuoConnect" page. Click Get Started. If you do not see this menu item, make sure that you have both DuoConnect 2.0.2 or later and Duo Desktop or Duo Device Health 2.24.0.0 or later installed, and install updated versions if needed.
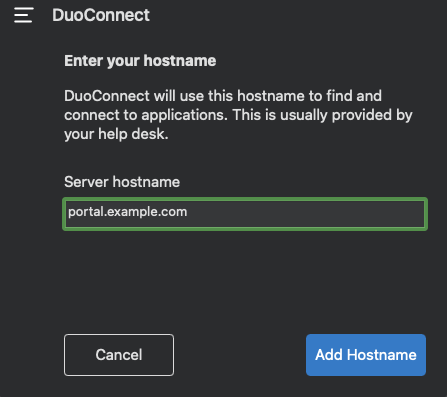
- On the "DuoConnect" app screen, enter the hostname of your Duo Network Gateway (such as "portal.example.com") as the Server hostname and then click Add Hostname. This adds your Duo Network Gateway hostname to the list of configured DuoConnect hostnames.
- Click anywhere else on the macOS desktop to minimize Duo Desktop's window back to the menu bar.
If you need to change the configured Duo Network Gateway hostname, return to the DuoConnect menu item in Duo Desktop to view the list of configured hostnames, and click the X icon to the right of the hostname to delete it and enter a new one.
Create an RDP Server Connection
Your organization's Duo administrator or Help Desk should provide you the RDP hostname to enter when configuring the RDP connection.
- Open the Microsoft Remote Desktop Connection app and click the + to expand the Add menu. Click Add PC.
- Type Remote Desktop and click the application search result.
- Enter the external hostname equivalent for your internal RDP server. Continuing the previous example setup, to connect to an internal server "rdp1.internal.example.com" with the "external.example.com" to "internal.example.com" subdomains configuration, you'd enter rdp1.external.example.com as the "PC name".
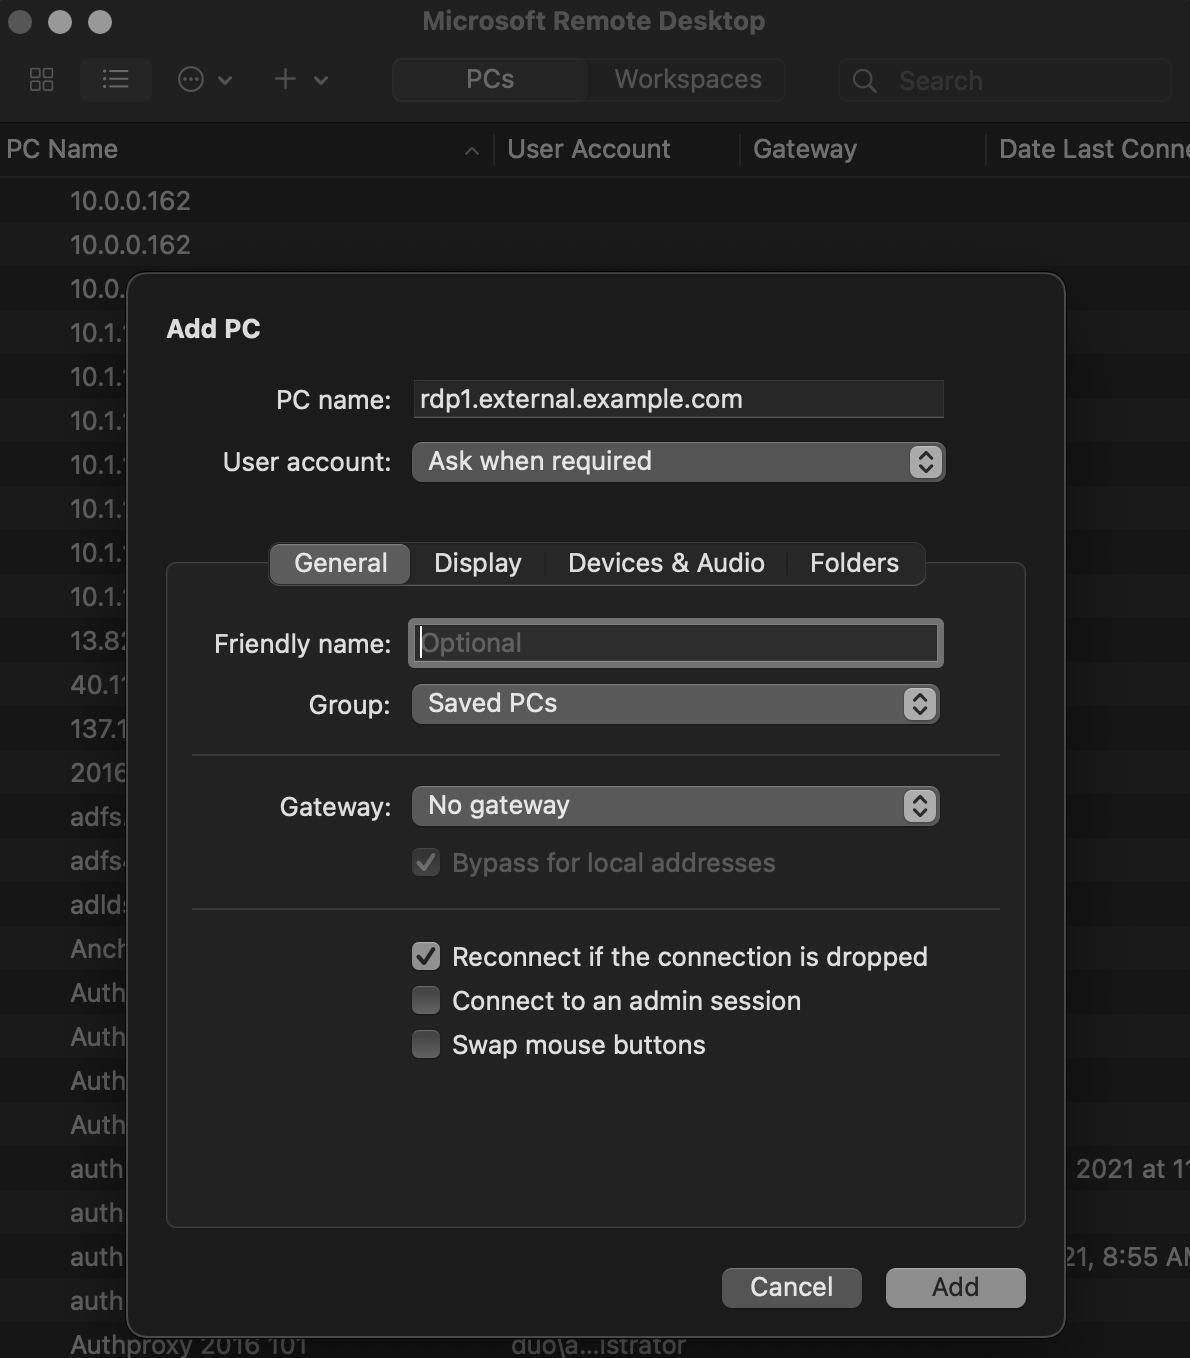
- Set any other options you want for this PC host connection, and then click Add to save it.
If you choose to have the Remote Desktop app "ask when required" for the Windows credentials, then you will need to enter the username and password for the remote system after establishing the RDP connection though Duo Network Gateway. If you select or add a user account instead, the Remote Desktop Connection app will pass those credentials to the remote Windows system.
- Double-click your newly added RDP PC name to launch the RDP connection.
Linux Clients
DuoConnect for Linux does not support RDP server access.
Install DuoConnect
- Download the latest DuoConnect Installer for Linux on your computer while logged in as a user with sudo permission. View checksums for Duo downloads.
- Open up a terminal window and navigate to the directory where you downloaded the DuoConnect installer gz file.
- In your terminal window type the following command to unpack the installer:
Note that the filename may differ slightly from this example to reflect the most recent version.tar xzvf DuoConnect-1.1.1.tar.gz - You can now run the installer by typing:
sudo ./install.sh - You'll be asked to enter your password. Upon successful installation you'll see the following:
+ cp duoconnect /usr/local/bin/
+ chmod 755 /usr/local/bin/duoconnect
+ chown 0:0 /usr/local/bin/duoconnect
Configure SSH
Now that you’ve installed DuoConnect, you need to update your SSH client configuration to use it.
Terminal
- Open your ~/.ssh/config file in a text editor. If you don't have this file, create it.
- Copy and paste in the DuoConnect connection strings you received from your Duo administrator into the end of your config file.
Here's an example of what the command might look like:
Host server.example.com ProxyCommand duoconnect -host=%h:%p -relay=https://server-ssh.example.com - Repeat these steps for all SSH servers provided to you by your Duo administrator.
- Save the ~/.ssh/config file.
- Test your SSH connection.
Test SSH Login
Once you've installed DuoConnect and updated your SSH client configuration(s), test an SSH connection to make sure everything is working properly.
- Start an SSH connection as you normally would to connect to your SSH server.
- A browser window will pop-up, prompting you to enter your organizational username and password.
- After primary login you'll need to complete Duo two-factor authentication (or enroll yourself in Duo).
- The next page instructs you to close the browser tab and return to your SSH client.
- You’ll be connected to the SSH server and can then continue with logging in to the remote server like you normally would.
Congratulations! You have successfully accessed your SSH server using DuoConnect!
Test RDP Login
Windows and macOS systems only
Once you've installed DuoConnect and Duo Desktop, configured your Duo Network Gateway in Duo Desktop, and created an RDP connection using the hostname provided by your administrator, test an RDP connection to make sure everything is working properly.
- From the Remote Desktop client, connect using the new RDP host connection you created.
- A browser window will pop-up, prompting you to enter your organizational username and password.
- After primary login you'll need to complete Duo two-factor authentication (or enroll yourself in Duo).
- The next page instructs you to close the browser tab and return to your RDP client.
- After that, you'll complete login at the remote Windows system by entering your username and password for that system (optionally saving them for future connections if you enabled that option in the Remote Desktop Connection client).
Congratulations! You have successfully accessed your RDP server using DuoConnect!
Updating DuoConnect
We'll periodically release new versions of DuoConnect with new features or functionality, bug fixes, or security patches.
DuoConnect updates are either optional or required. You'll be able to skip an optional update and continue connecting to the remote SSH or RDP host, but required updates must be installed before you can access any system.
Optional DuoConnect Updates
If you are not running the latest DuoConnect when attempting to authenticate to an SSH or RDP server we'll let you know that your DuoConnect client is out of date.
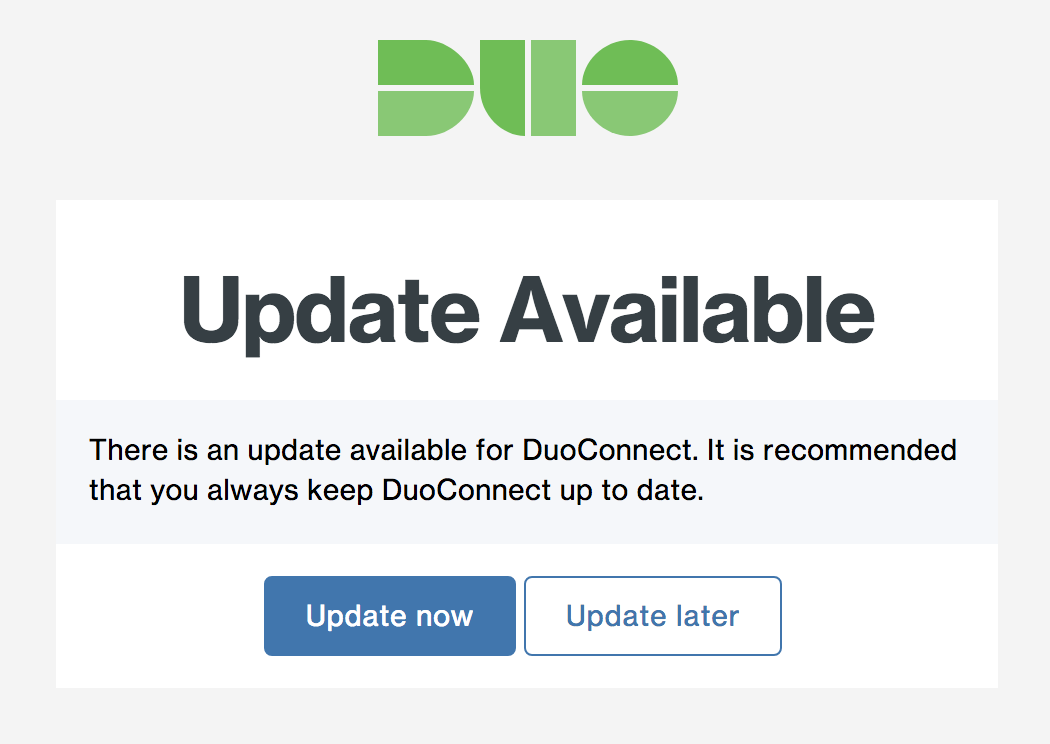
If you click Update Now, you will be taken to a page to download and install the newest version of DuoConnect for your computer platform.
If you click Update Later, you will complete authentication and successfully log in but will be prompted again to update the next time you need to authenticate to an SSH server.
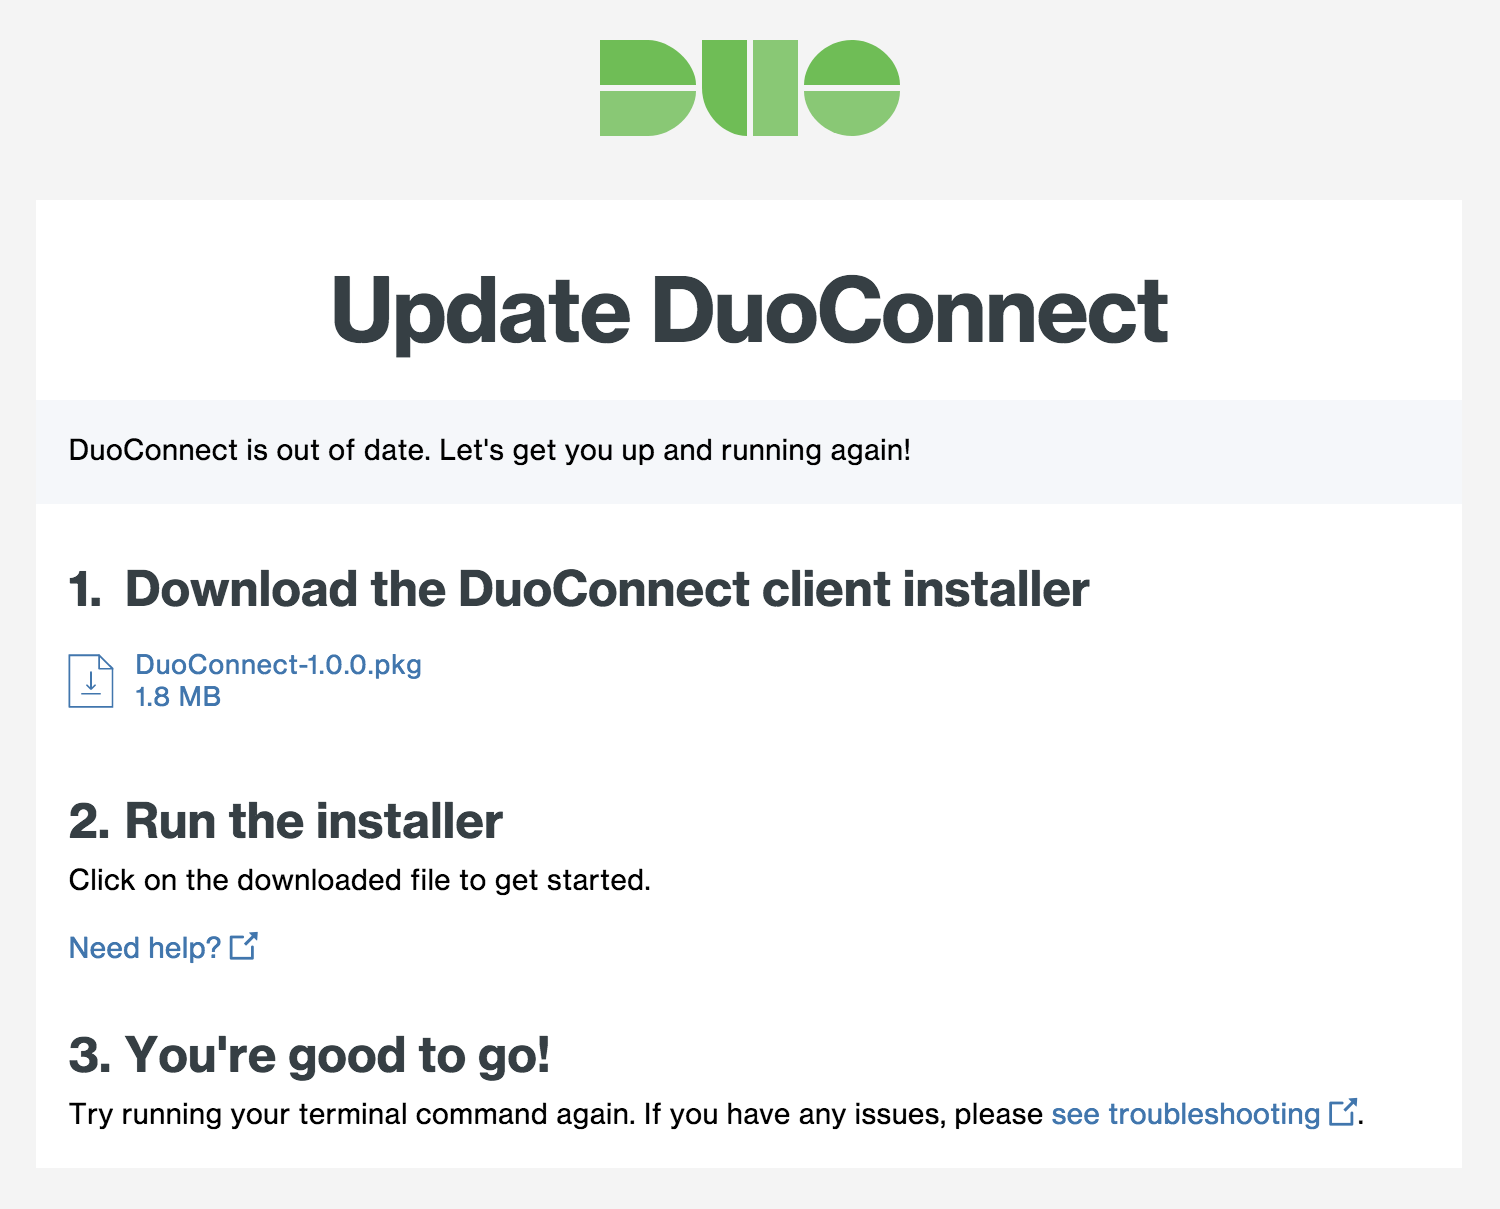
After you install the updated DuoConnect client you will need to reconnect to the remote SSH or RDP server.
Required DuoConnect Updates
If you are not running the minimum required version of DuoConnect when attempting to authenticate to an SSH or RDP server, we'll let you know that your DuoConnect client is out of date and that you must update to continue connecting.

After you install the updated DuoConnect client you will need to reconnect to the remote RDP or SSH server.
Frequently Asked Questions
Chrome on macOS opens a blank browser page and doesn't authenticate. What should I do?
There is a macOS issue where Chrome fails to open links correctly with a pending Chrome update. Update and relaunch Chrome to proceed. A fix for this is expected in macOS 10.13.4.
Why do I see a browser pop-up prompting me for first-factor without initiating a connection at the beginning of the day when using VS Code or similar tools?
Your editor is attempting a git fetch every time you go to it. You can disable the auto-fetch feature by changing the following setting: "git.autofetch": false.
You can find more information here: Using Version Control in VS Code.
Why don't I see the DuoConnect setting in Duo Device Health?
If you do not see the DuoConnect item on Duo Desktop's menu, make sure that you have both DuoConnect 2.0.2 or later and Duo Desktop or Duo Device Health 2.24.0.0 or later installed. If not, install the updated versions of these applications using the instructions for Windows or macOS.
